Versions Compared

Key

  • This line was added.
  • This line was removed.
  • Formatting was changed.
Include Page
TERMS:Channel
TERMS:Channel
Expand
titleCreate a Channel

Create a Channel

Open Main Menu > Settings
  1. Go to Main Menu > Settings. The Settings section appears.

Click on 
  1. Select Channels.

Click on Add
  1. Select +

  2. Enter the channel's name

of the channel
  1. and add any translations in

the Name field.
  • Leave the other channel settings for now and save. 

  • Add the user roles that should have access to the channel under roles.
    1. the Name field. The ID is pre-filled from the input in the name field.
      💡 The channel ID is the link: customer.picturepark.com/contents/gdpr

    Now you can create the channel already. It is added to the first position in the list.

    settings_channel_create-new_115.mp4

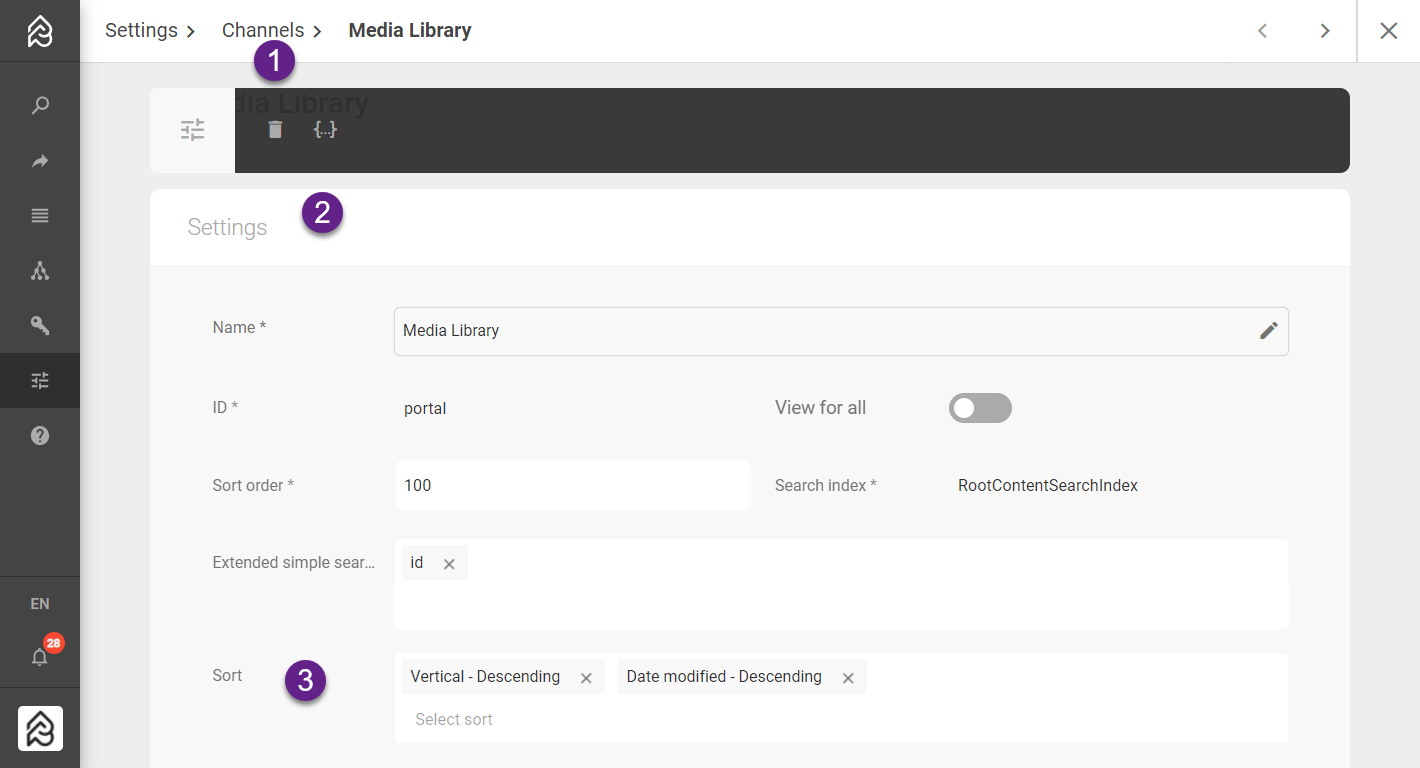
    All other settings are pre-filled with defaults which you can change:

    1. You can update the sort order used in the channel dropdown in the Content Browser.

    2. You can update the sort fields, which are the sorting options you allow the user to see in the channel's Content Browser.

    3. You can select the default sort for all content items in the channel.

    Double-clicking on the channel will open the channel details in the 2-column layout. You can now add filters (faceted navigation) and permissions (roles that have access) on the right side:

    1. Add any Content Browser filters you would like

    to have
    1. for this channel by

    clicking 
    1. selecting Add in the Content browser

    filter section
    1. filters tab.

      1. Add a filter

    only
      1. to show only Content Items

    that have
      1. with the Product Information Layer

    "Product information"
      1. assigned and the media type

    "
      1. Technical Product Sheet

    "
      1. or

    "
      1. Product Shot.

    "
      1. Code Block
        {
        	"kind": "AndFilter",
        	"filters": [
        		{
        			"kind": "TermFilter",
        			"field": "layerSchemaIds",
        			"term": "Vertical"
        		},
        		{
        			"kind": "OrFilter",
        			"filters": [
        				{
        					"kind": "TermFilter",
        					"field": "basicInformation.mediaType._refId",
        					"term": "648b76b163654189be7b6638b31fb243"
        				},
        				{
        					"kind": "TermFilter",
        					"field": "basicInformation.mediaType._refId",
        					"term": "d019419aae9a4eaeb715d35efa0e61d7"
        				}
        			]
        		}
        	]
        }
    channel-create-productsOnly.mp4
    1. Add the user roles that should have access to the channel in the permissions tab or select View for all if every user needs access.

    Problem: New The new channel is not visible in the channel dropdown - . It usually missing lacks permissions (your user is in a user role which and cannot see the channel).

    1. Open the Channel.

    2. Edit Settings.

    Check "
    1. Select View for All

    "
    1. .

    2. Validate if you can see it

    -
    1. , and then adapt the User Roles.

    Problem: New The new channel is empty - probably due to a wrong channel filter.  

    1. Open the Channel.

    2. Edit Channel Filter.

    3. Remove your Query Filter.

    4. Validate if you can see content in your

    channels
    1. channel's Content Browser.

    2. Adapt the Query Filter.

    Expand
    titleCustom Channel Sort Fields

    Custom Channel Sort Fields

    For custom sort fields, follow the steps:

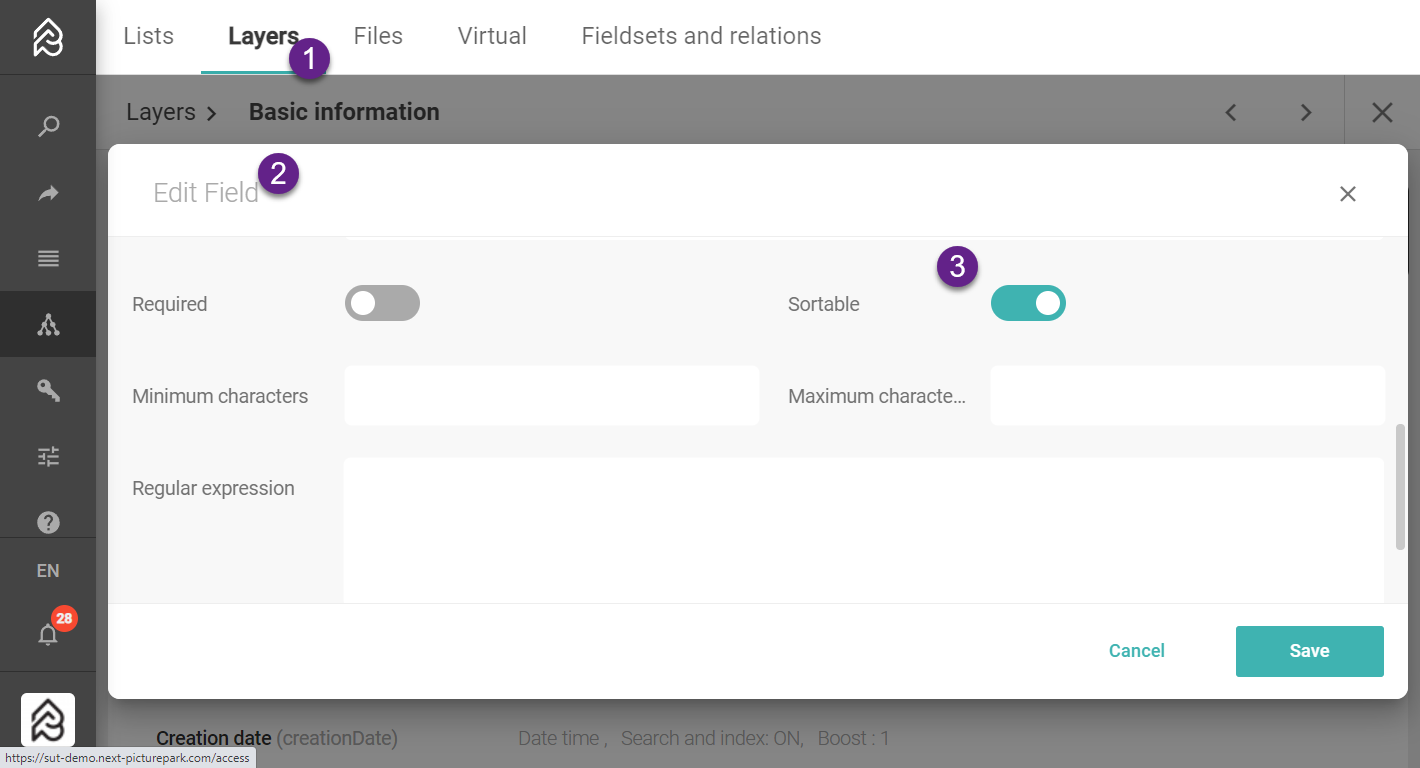
    1. Validate that the field on the layer is sortable.

      1. Open Layer, edit field,

    enable “sortable”
      1. and turn on the Sortable toggle. After changing this setting, you need to re-render.

        Image Modified
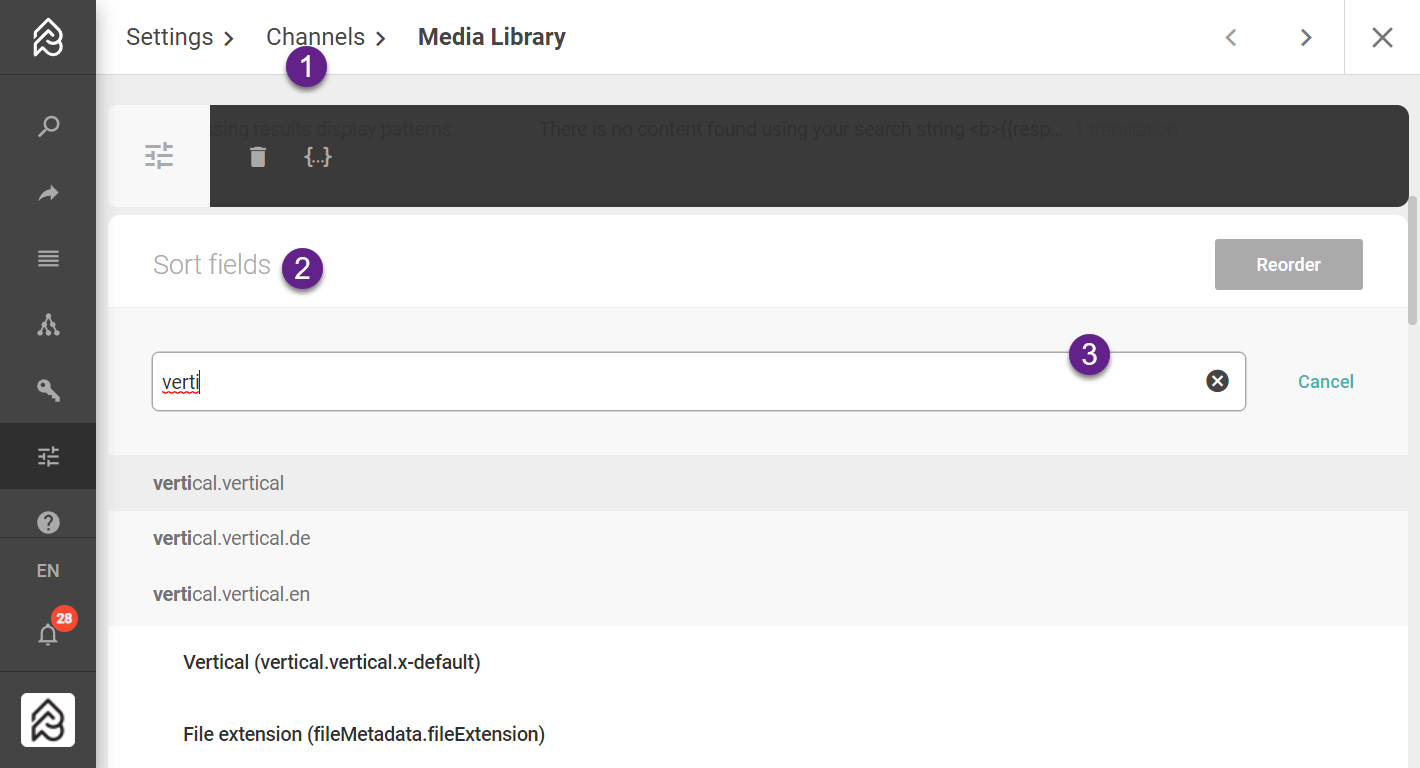
    1. Add field as

    “sort field”
    1. a Sort field (down below).

      1. Open the sort fields panel in the channel settings.

        Image Modified
    2. Add field as sort in the channel settings.

    Image Removed
    1. settings_channel_add-new-sort-field_115.mp4
    Expand
    titleOpen a Channel

    Open a Channel by Channel ID

    You can open the channel from within the Content Browser or via URL if you know the ID. Bear in mind that you can However, you may lose access when channel permissions for the Channel change. 

    Code Block
    https://customer.picturepark.com/contents/product
    Info

    This way you can skip the dashboard and directly jump to your content.

    Problem: New The new channel is not visible in the channel dropdown list - usually due to missing permissions (your user is in a user role which that cannot see the channel)

    1. Open the Channel.

    2. Edit Settings.

    Check "
    1. Select View for All

    "
    1. .

    2. Validate if you can see it

    -
    1. , and then adapt the User Roles.

    Problem: New The new channel is not accessible from the bookmark > . The channel was probably removed.

    1. Open Settings.

    2. Check if the channel is there or contact your Picturepark Admin. 

    Expand
    titleUpdate a Channel

    Update a Channel

    Open Sidebar > Settings
    1. Open Settings from the sidebar. The Settings section appears.

    Click on
    1. Select Channels.

    2. Double-click on the channel you wish to edit (or choose settings). 

    3. Edit in UI or JSON.

    settings_channel-_update-renameUiAndJsonchannel_115.mp4
    Expand
    titleCopy a Channel

    Copy a Channel

    Open Sidebar > Settings
    1. Open Settings from the sidebar. The Settings section appears.

    Click on
    1. Select Channels.

    2. Double-click on the channel you wish to edit (or choose settings). 

    3. Open

    the
    1. Edit JSON.

    2. Copy the whole JSON.

    3. Go back to Channels.

    4. Add a new channel.

    5. Provide a name and save. 

    6. Double-click to open and Edit

    the
    1. JSON.

    2. Paste the copied JSON. 

    Keep
      1. Update the new channel ID 

    1. Save the JSON

    channel-copy-productsOnly.mp4
    Warning

    Ids IDs must be unique, so you have to keep the ID. Saving will fail when you use a channel ID that is already present in this Picturepark. 

    Expand
    titleDelete a Channel

    Delete a Channel

    Open Sidebar > Settings
    1. Open Settings from the sidebar. The Settings section appears.

    Click on
    1. Select Channels.

      1. Double-click to open.

      2. Open the context menu. 

    2. Select

    "Delete"
    1. the Remove icon. 

    2. Confirm deletion.

    Warning

    There is no undo in Picturepark. Deleted Channels are gone. 

    Bookmarks to the channel break and users lose access.

    channel-delete-confirm

    .

    mp4

    Expand
    titleUse Cases for Channels

    Channel Use Cases

    • Separating content by type, status, department owner, or usage.

    • Restricting the content shown to specific users, such as partners or customers" . This is the base where you will find all Content Items.

    • New user roles are automatically added to the Root Channel and removed if the user role is deleted.

    • Every item created/uploaded with will be seen in the Root Channel (if view permission is given). There is no Query Filter on By default, the Root Channel per defaultdoes not have a query filter, although one can be set.

    • You can't delete the root channel as Picturepark depends on it for uploads and collections.